A digital marketing expert’s ultimate goals are relatively simple: Drive insane traffic, build an email list, generate noise on social media, and conversion savvy.
Of course, such things are easier said than done!
What if I told you there is a tool that can do all the important points mention above.
Introducing Sumo (formerly SumoMe) — Sumo arms you with a suite of tools to increase your traffic, build a following and track your success every step of the way to start converting your visitors into lifelong customers.
Let’s take an in-depth look at all this incredible tool has to offer — with a mind to see if it provides value for money, and whether or not it lives up to expectations.
Introducing Sumo (Features)
Sumo is free website tools to automate growth.
What inspired the creation of this tool is they noticed lots of people struggle to collect emails because the tools just aren’t available or are too expensive. So they thought, why not make Sumo tools available to you?
Sumo isn’t your typical WordPress plugin.
In fact, it’s not actually a plugin at all. It’s a set of cross-platform-compatible tools, meaning it can be used on just about any website (WordPress-powered, Joomla or otherwise).
So if it isn’t solely for WordPress and it isn’t a plugin, what is it?
Simply put: Sumo is a powerful, all-in-one suite of apps — a collection of standalone tools to boost your site’s performance in all kinds of cool ways.
Get 50% Discount to Master ALL Aspects of Digital Marketing That Can Earn You $2,500 - $5,000 a month (Even if you are a complete beginner!)
Our students that intentionally implement what they learn from our digital marketing course make back the entire course fee within a single month or more after completing our course because our course gives them many income generating options with unlimited earning potential with no age or location barrier. The best part is no technical skills are required.
An opportunity to change your lifestyle and make money working from anywhere in the world. The results our students get from our digital marketing course prove this could be applied to any market or country and that it is designed for any skill level and work background.
*By signing up, you agree to our privacy policy and terms of service.
With new apps/features added regularly, Sumo’s capabilities will only improve.
However, to date, Sumo’s apps fall into six categories: List building, on-site analytics, social sharing, traffic boosting, communication and eCommerce.
The best way to show what Sumo can do is to introduce the full features of Sumo apps.
Sumo apps available (13):
List Building
Sumo list building apps help you to converts one-time visitors into lifelong readers and customers. Create professional-looking pop-ups that appear on clicks, timers and before people leave!
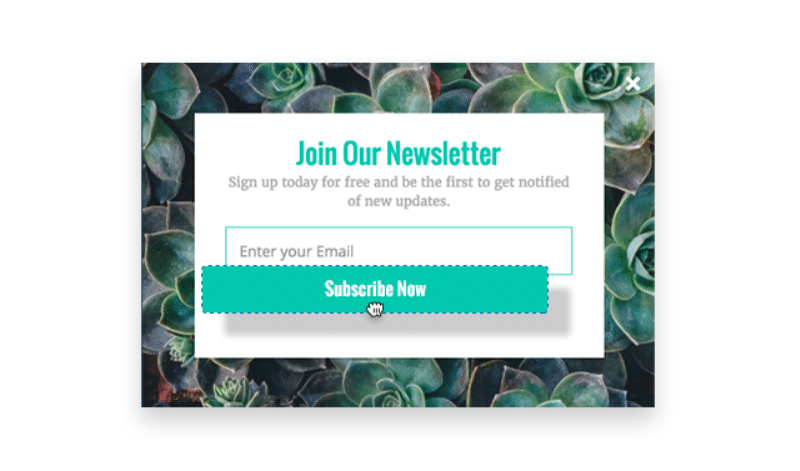
With advanced drag-and-drop functionality, this is the most advanced (yet easiest to use) email capture tool on the internet.
Here are all the list building apps available to you.
- List Builder — pop-up opt-in forms.
- Scroll Box — corner-positioned opt-in forms triggered when a visitor reaches a specific scroll point.
- Smart Bar — notification toolbar.
- Welcome Mat — full-screen call to action.
On-site Analytics
With this feature, you can keep track of all your website statistics from your dashboard/backend using the Sumo Google analytics app. This is literally the easiest way to see your stats from Google Analytics.
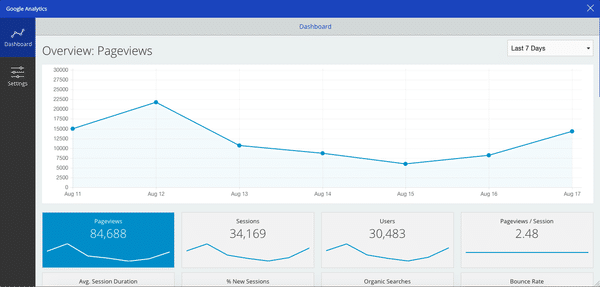
- Google Analytics — Google Analytics in the WordPress dashboard.
- Content Analytics — coloured scroll maps showing how much of your content visitors read.
- Heat Maps — shows where visitors are clicking on your site.
Social Sharing
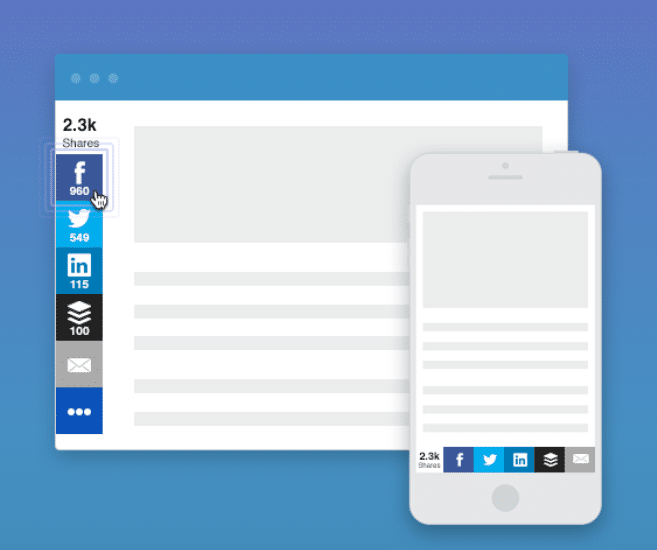
Share makes it stupid-easy for your visitors to share your content with their friends, family, and others with built-in social media buttons for your site.
The more people share your site and content, the more viral traffic you get.
- Share — social sharing buttons.
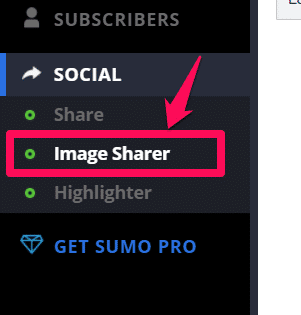
- Image Sharer — social sharing buttons for images.
- Highlighter — visitors can highlight your content to share or tweet.
Traffic
- Discover — reciprocated content sharing among Sumo users.
Communication
- Contact Form — visitors can email you directly from your website.
eCommerce
- Buy Button — streamlined e-commerce functionality.
As you can see, Sumo handles lots of important tasks — tasks that could ordinarily require seven, eight, or even nine separate plugins. With such varied, useful, and powerful functionalities, the Sumo suite is not just for growing a website but growing an entire business.
Sumo Pricing
Sumo’s tools are available in these pricing tiers:
- Just Starting
- Free
- 500 Subscribers
- Basic Email Integrations
- Creative Freedom
- Professional
- $29/month on a Yearly Plan
- The “Just Starting” Plan, Plus:
- Unlimited Subscribers
- Pro Visitor Targeting
- Pre-Built Templates
- Small Business
- $79/month on a Yearly Plan
- The “Professional” Plan, Plus:
- Live Chat With Customers
- Content Upgrades
- Pro Analytics
- Ecommerce
- $199/month on a Yearly Plan
- The “Small Business” Plan, Plus:
- Pro Email Integrations
- Discount Codes
- Remove Sumo Branding
- Team
- Contact for Price
- The “Ecommerce” Plan, Plus:
- Unlimited Sites
- Unlimited Seats
- VIP Sumo Support
How to install Sumo on any website
Step 1: Sign up
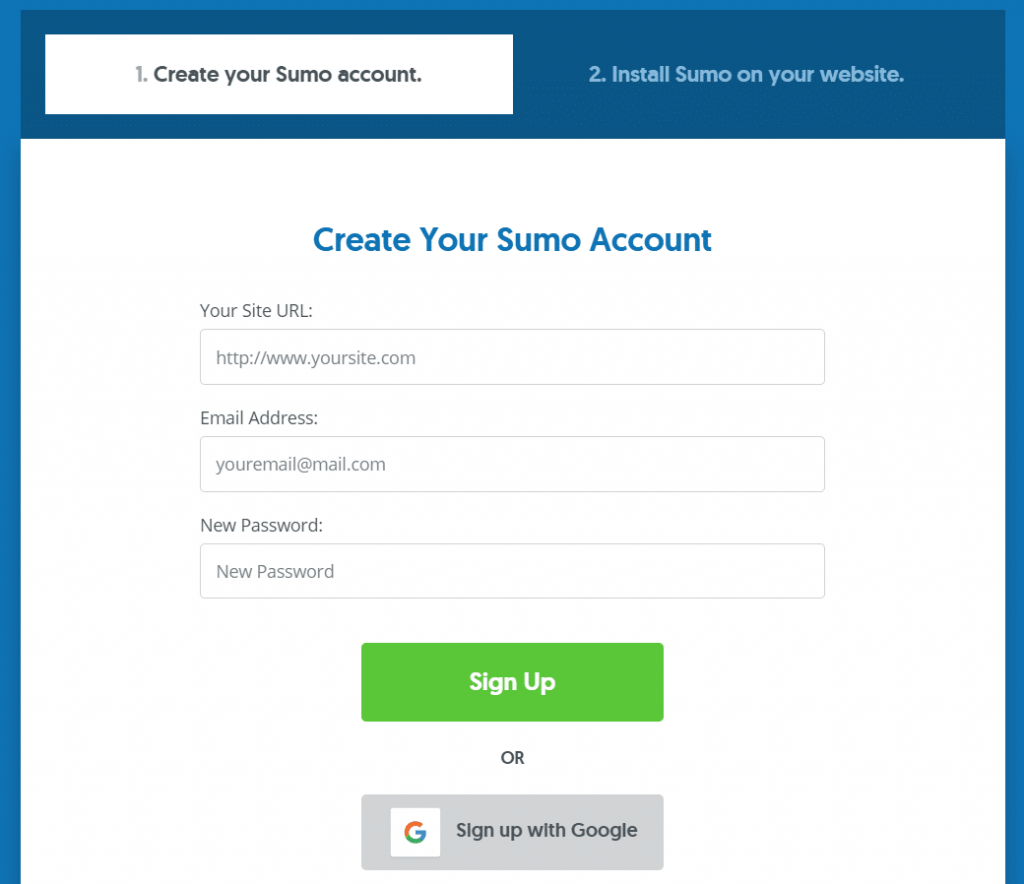
To sign up for a Sumo account visit this link and click on the Try it Now button and then add your website, email address and password or sign up with Google.
After that, you should pick a Sumo plan. You can either go with the free basic plan or one of the paid plans.
If you want the paid plan, I recommend that you sign up for the Professional plan. It has numerous extra features like unlimited subscribers, access to better templates, click triggers, push notifications, etc. If you want more features like live chat, content upgrades, pro analytics, etc. you can go with one of the bigger plans.
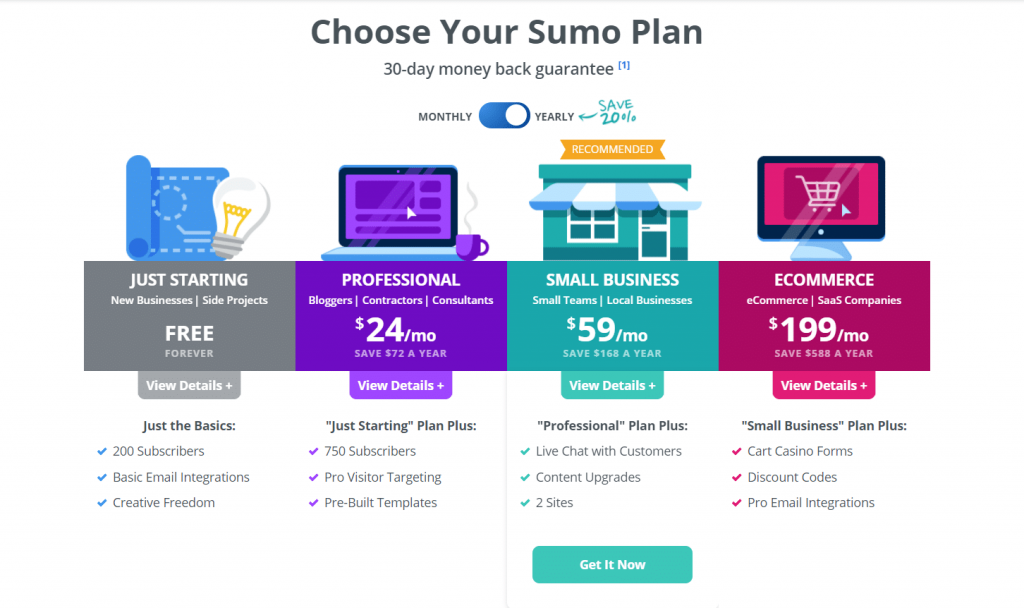
They have both monthly and annual options available. When you choose the annual plan you get a 40% discount.
Step 2: Install Sumo plugin or insert code
After you sign up, Sumo will provide you with a code, all you need to do is copy and paste this into the <head> of your HTML to install on any website.
WordPress users can use the plugin to install, but I recommend using the code as it means one less plugin which can improve loading time.
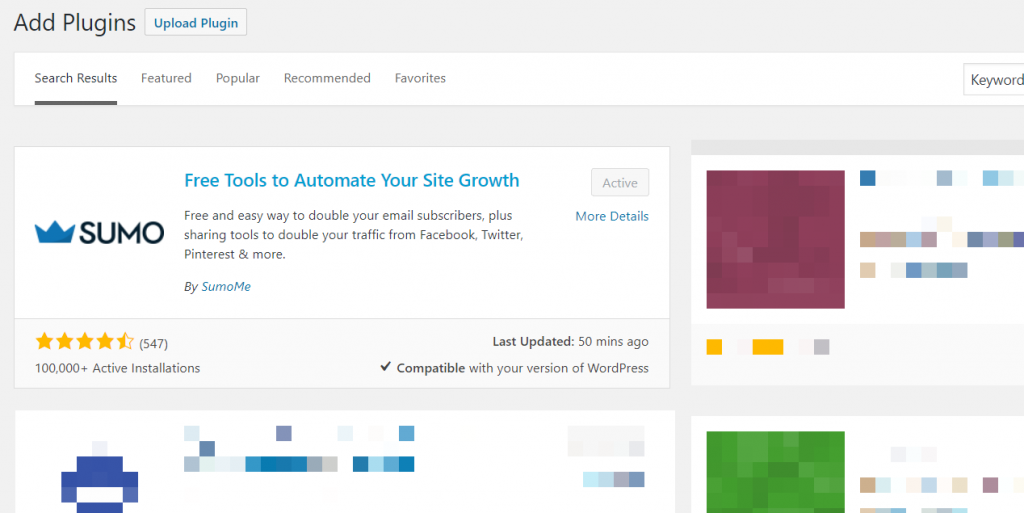
After you install the plugin go to your website or blog’s home page and type in the words sumo and immediately type the up arrow.
A popup will appear and you can login to Sumo. Your Sumo dashboard will open and you can begin using it to drive traffic and to generate leads, followers and customers.
WordPress users can also watch the video below:
How to install Sumo on Shopify website
How to install Sumo on Squarespace website
Configuring Sumo Apps
Setting up Sumo Share Button
Social Sharing Buttons will help your website get more traffic and exposure for your website.
It will help your website go up the ranks. But, don’t get too excited. Of course, it is also important to make sure that your content is worth sharing.
Whenever visitors or readers share your content, more and more people will see it. Your content’s strength is measured by how many times it was shared, liked, tweeted or posted on different social networking sites.
If your content is frequently shared, that will help your website get better ranking. If you have these buttons on every post, it will be easier for them to promote your content and site.
With that said, here is how you can add a share feature:
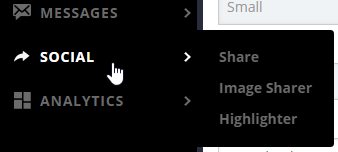
Just navigate to your Sumo dashboard and hover over ‘Social’ in the menu on the left and click on ‘Share’. Then activate it so that you can set it up.
Once you have activated it, you should go to the settings and choose the share buttons you want to display on your site. They have several available.

Pick the ones your website visitors are most likely to use. After you choose the share buttons you can adjust other settings too like the size of the buttons, the number of share buttons to display, style, display share counts, etc.
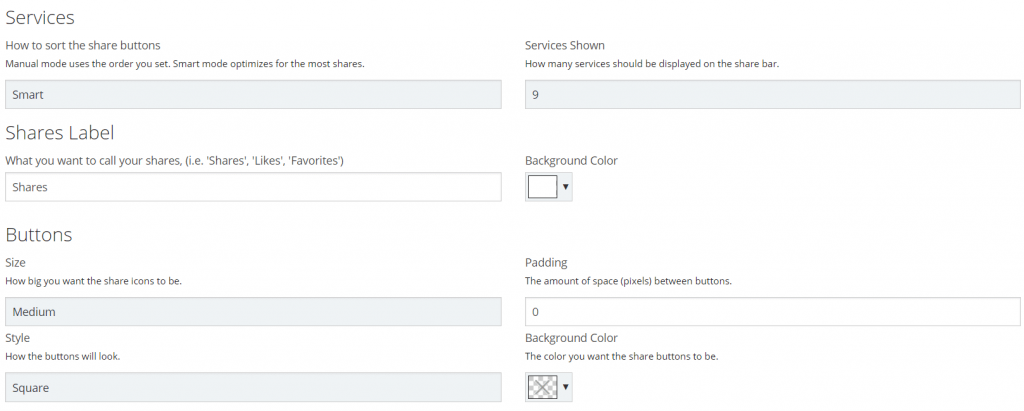
One setting you should definitely use is the ‘Smart’ option. This will ensure that the most used share buttons are only displayed, thereby helping you get even more shares.
After that, select the areas you want to show share buttons on your website (both mobile and desktop versions). Click the gear to edit per-position settings.
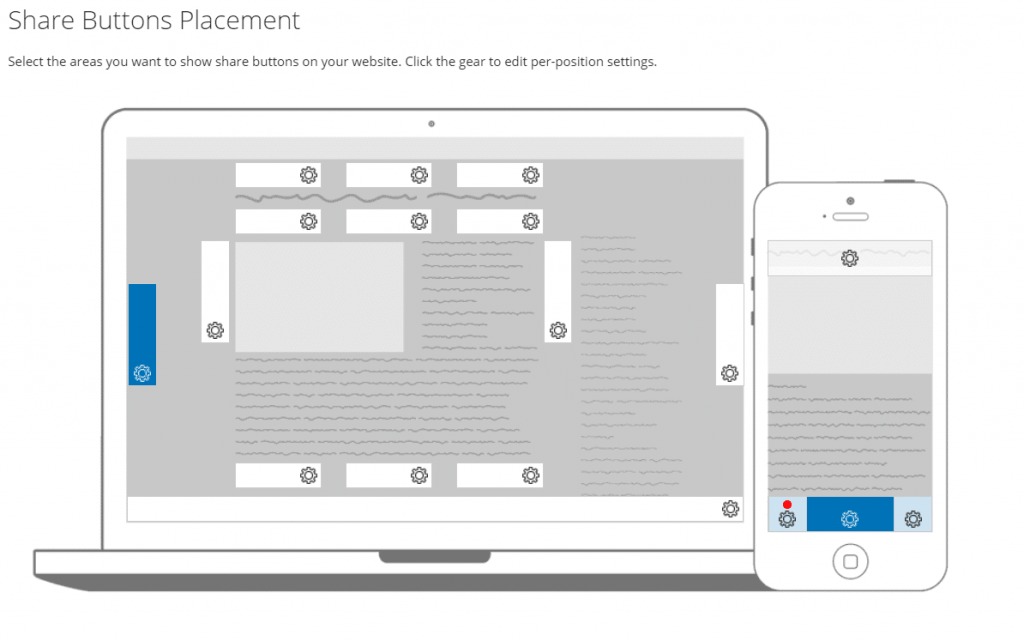
Sumo has a very visual setting (as seen above) that makes it easy to add the buttons to the right places both on desktops and mobile devices.
After that, you can make more advanced changes under mobile optimized (to display different share buttons for mobile devices) and Display Rules (to set which pages the buttons shouldn’t be displayed on).
Next, under ‘Services’ connect your Facebook account to display share counts and add your Twitter username if you want it to appear when someone tweets your page.


Once you have made and saved all your buttons, visit one of the pages you have added the buttons to.
It should look like the one below.
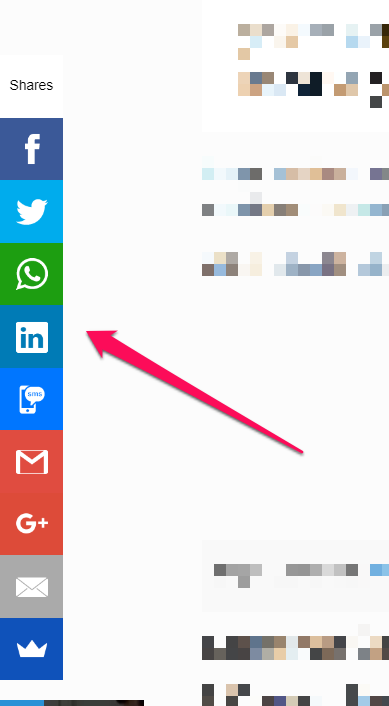
Furthermore, Sumo allows you can also create image share buttons where a share buttons appears over an image when you scroll over it. I noticed that I get increased shares after I activated the share buttons on my images.
There’s even a highlighter feature that lets visitors highlight text and share it along with the URL of the page on Facebook and Twitter.
Immediately you are done customising… don’t forget to SAVE your social share setting.
You can see the stats of your share app inside the “Clicks” section located on the left sidebar menu. Keep in mind that this will show you the amount of clicks your share links got in a specific date or time range of a singular webpage or your website in general.
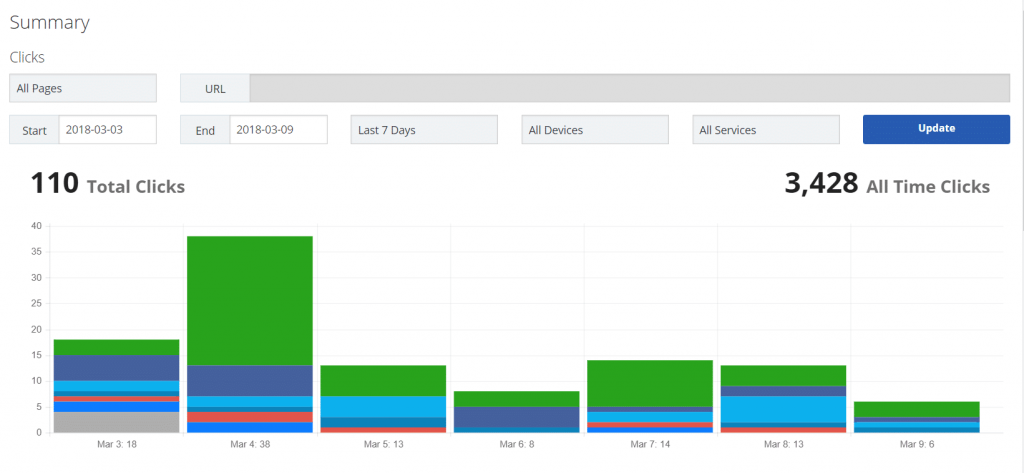
You can display these stats results by social network and device. This results will be very helpful to realise from which social network you are getting the most traffic.
Creating a New Form
Before we can get started, we need to be logged in to Sumo.
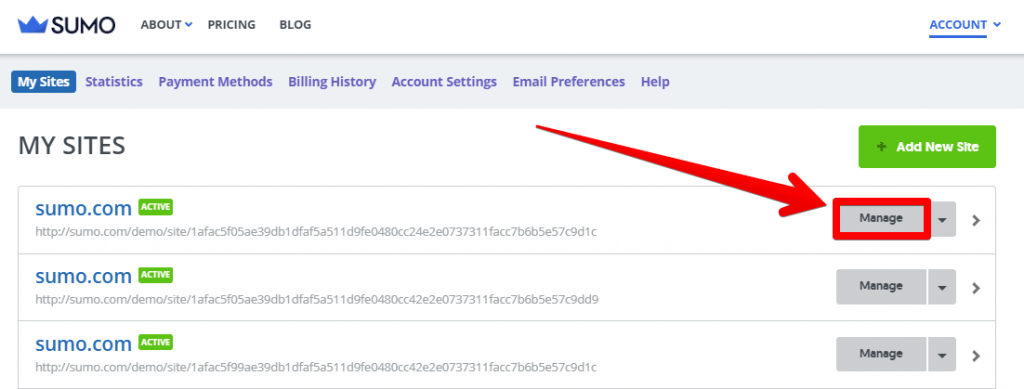
Navigate to your Sumo Sites, then click on the Manage button next to the Site you want to work on.
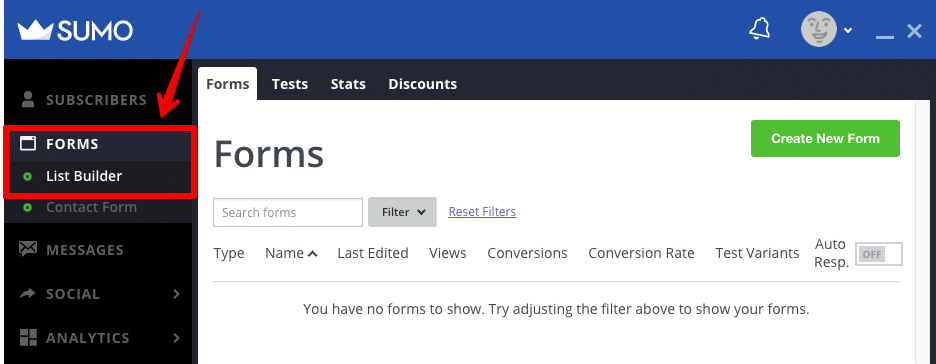
After you log in for the first time, you’re taken directly to List Builder
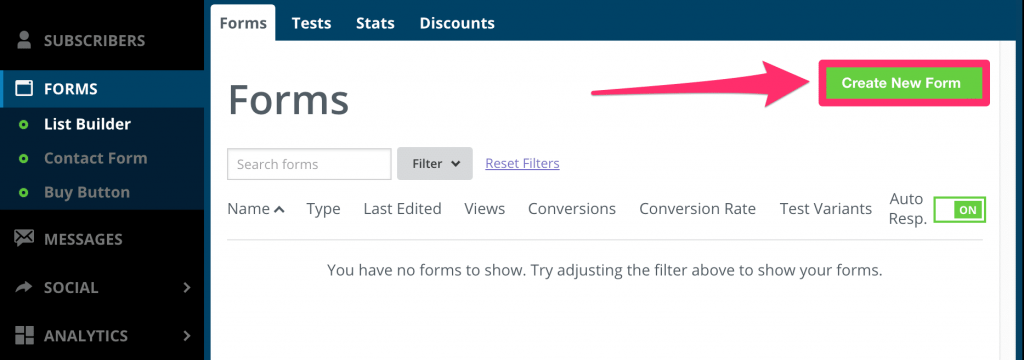
You should now be in the Forms Dashboard. This is where you can create new Forms and manage existing ones. Let’s go ahead and create a new one by clicking on the Create New Form button.
Step 2 – Selecting your Goal
To get started in setting up your Form, you first need to choose one of the following Goals:
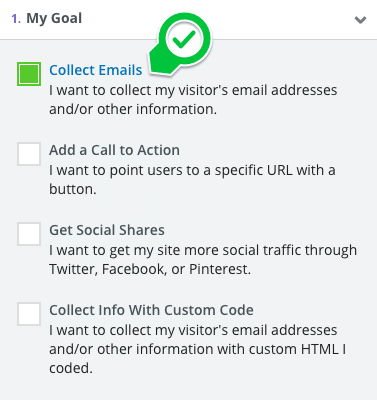
- Collect Emails – Choose this option to collect the email addresses, as well as any other information you wish to collect from your visitors, into your email list.
- Add a Call to Action – Choose this option to direct visitors to a specific URL or to offer a downloadable file (also known as a Content Upgrade).
- Get Social Shares – Choose this option to build your presence and following on these major social media platforms: Facebook, Twitter, and Pinterest.
- Collect Info With Custom Code – Choose this option to display your own HTML/CSS Form. **Note: Conversions cannot be tracked with custom Forms and JavaScript is not supported.
We’re going to focus on building your email list first, so let’s choose Collect Emails.
Step 3 – Choosing a Form Type
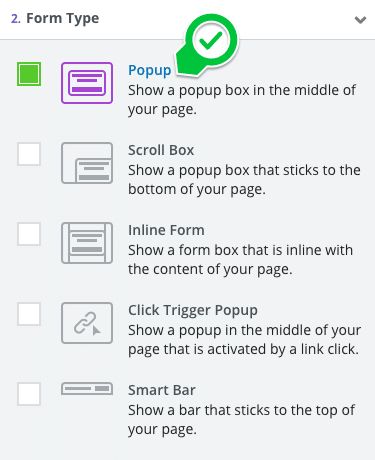
- Popup – Choose this Form to display a popup in the center of the page. This can be set to appear based on a manual timer or when visitors attempt to leave the page.
- Scroll Box – Choose this Form to display a popup in one of the corners after visitors scroll down a certain percentage of the page.
- Inline Form – Choose this Form to insert an HTML code snippet that displays as an embedded Inline Form.
- Click Trigger Popup – Choose this Form to create a popup that is triggered by clicking on an element on your page: a button, text, or images.
- Smart Bar – Choose this Form to display a banner at the top or bottom of your page.
For now, let’s go over our most popular Form Type, the Popup.
Step 4 – Designing and Customizing your Form
In this section, we’re going to cover how to design your new email list building popup!
We have numerous pre-made templates for you to choose from. Feel free to pick a template as a starting point: they’re all customizable, allowing you to have the most control in matching your Form’s design to the overall feel of your site.
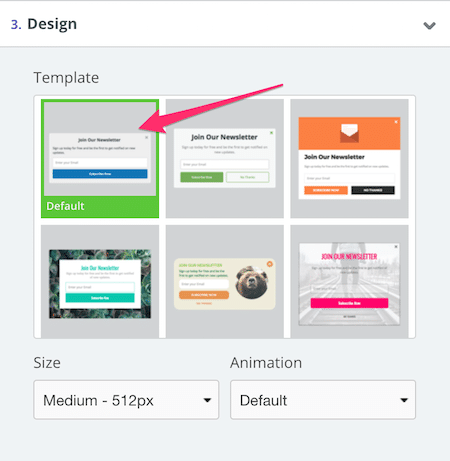
- Once you’ve decided on one of the pre-made templates, select it by clicking on it. It’s been selected when the border around it turns green.
- Select a Form Size – The display size always matches the widest or tallest element in your Form, and scales for the selected chosen size (For Example: If you choose Medium – 512px, and the Form is tall, it is going to have a maximum height of 512px and scales the width to the correct ratio for the Form. If you have a wide Form and choose Medium – 512px, then it is going to have a maximum width of 512px and scales the height to the correct ratio for the Form).
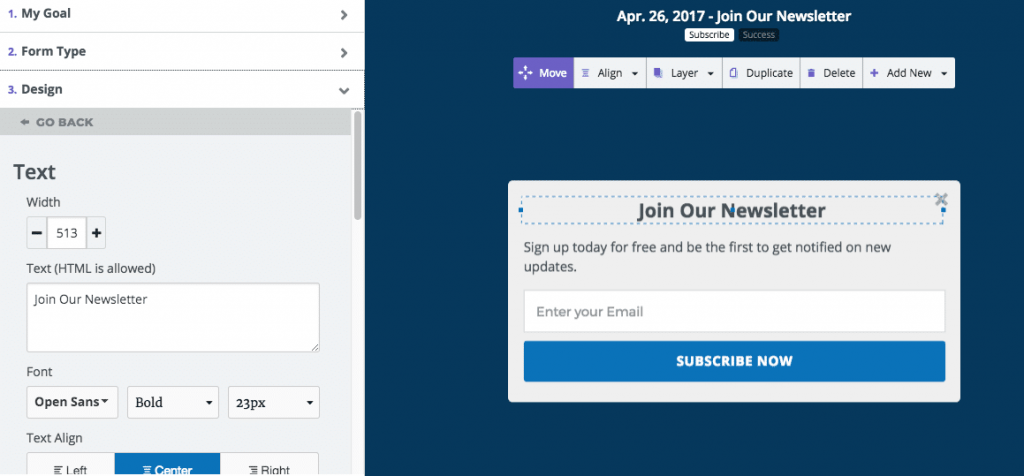
- Customize your Form with the WYSIWYG editor. Be sure to change all of the text to fit your website: using your own copy be more engaging for your visitors!
- When adding images to your form, it is important to ensure you use an image file size between 100kb-400kb. This will help ensure the image is loading at optimal speed and doesn’t cause images to load slowly on your form.
Almost every part of the popup can be customized. Try it out and have some fun with it! Click here for an in-depth walkthrough on our WYSIWYG editor.
Step 5 – Configuring your Form’s Visibility
Hey, your Form is starting to look pretty awesome! Now let’s make sure that your visitors can see it at the best possible time by customizing exactly when your Form appears on your site.
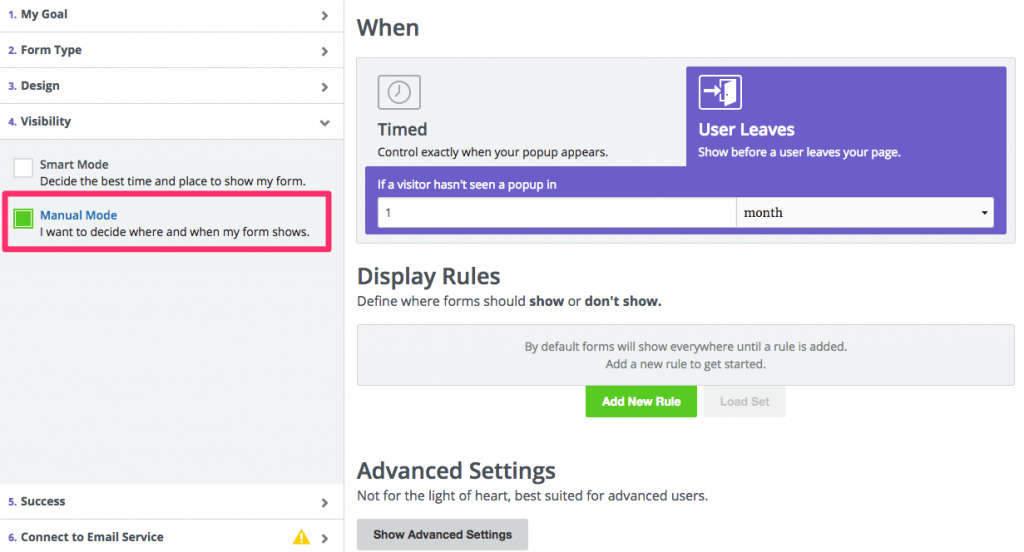
You can leave your Form in Smart Mode and we’ll optimize the timing of your Form’s visibility for you. For some extra customization, you can click on Manual Mode to make additional tweaks.
In Manual Mode, you can switch between two options: Timed (which is when a Form appears after a certain amount of time passes) and User Leaves (which is when a Form shows at the time a visitor tries to leave your site).
With Display Rules, you can determine exactly where on your website the Form appears, and the Advanced Settings allow you to further customize your Form behaviours. For our purposes, we are be leaving these options at their defaults and moving on.
Step 6 – Configuring your Form’s Success Events

The Success tab is where you can determine what happens after a conversion happens.
You can set up an automatic email response for new subscribers, add a content upgrade, a redirect to a specific URL, or add Tracking Pixels! Feel free to explore the linked content for more information on setting up these features.
Step 7 – Connecting your Form to an Email Service (Pro Only)

Setting up Smart Bar
Smart Bar sits beautifully at the top of your website reminding your visitors to join your email list, check out your new blog post, or whatever else you want them to do.
You’ll be amazed at what a simple reminder can do.
Let’s start with designing your Smart Bar. As long as you are in the “subscribe” state you’re designing the view your visitors will see when they first encounter your bar.
Here is how to create a new SUMO Smart Bar;
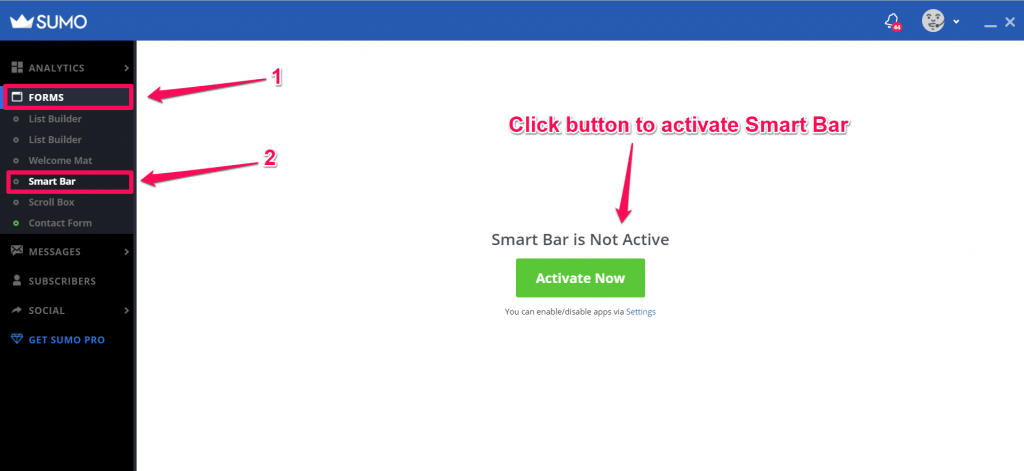
Go to your SUMO dashboard. Under FORMS, select Smartbar and click the big green button to activate it.
Navigate to campaign under home, then create a new campaign by clicking the blue button as seen in the photo below.
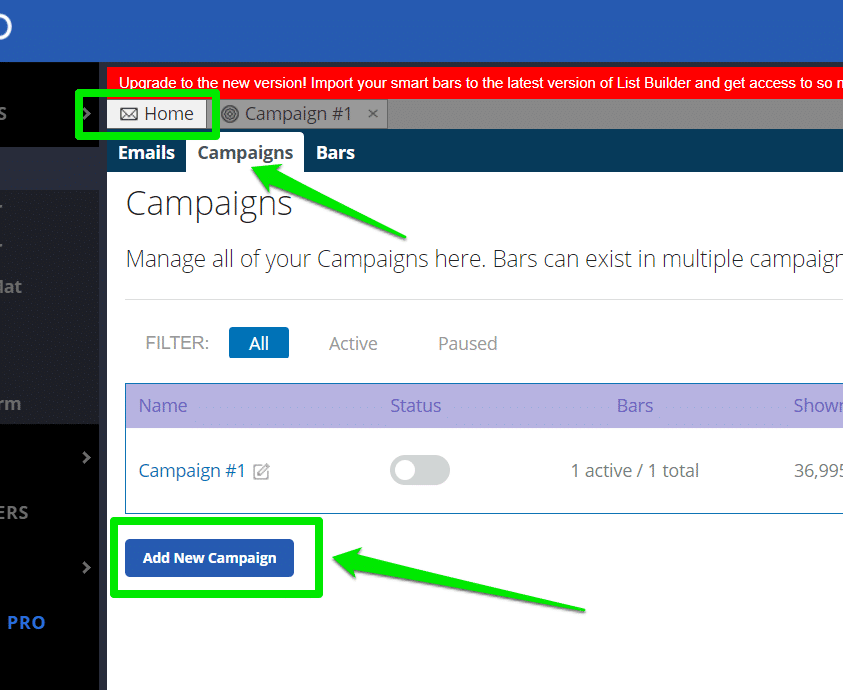
Under Campaigns, you can manage all of your Campaigns here. Bars can exist in multiple campaigns where their Status of Active/Paused is unique to that campaign.
Give your campaign a name.
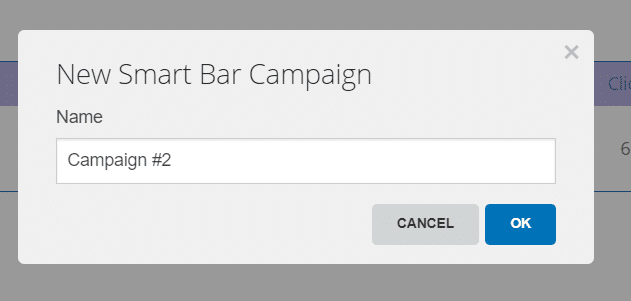
After you have created a new campaign, you will find it next to HOME tab.

Go-to Bars & A/B Test to create new Smart Bar.
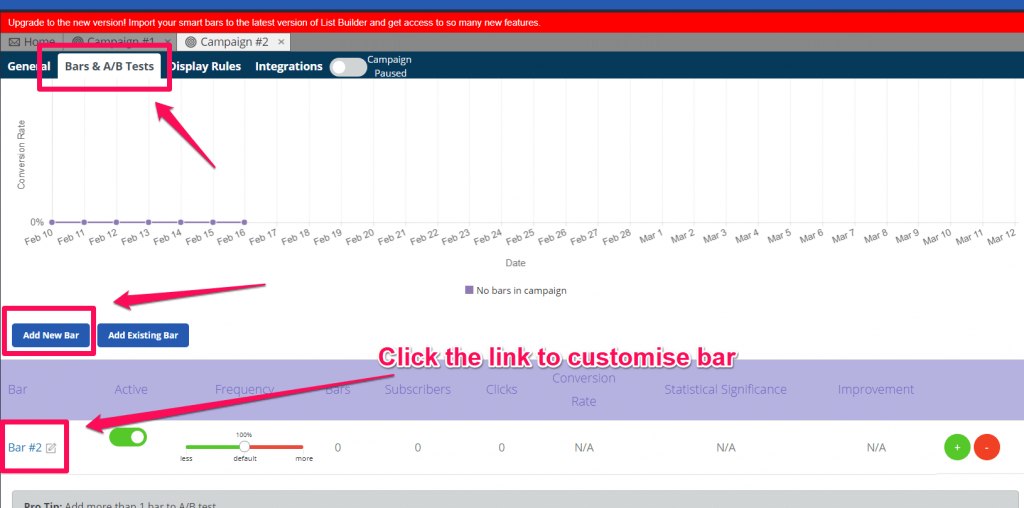
Using the simple-to-use wizard, popup builder customization features include:
- Select Template – Free users can only access the default and small template. Want all templates? Upgrade to Smart Bar Pro .
- Bar Mode – Choose a specific purpose of your Smart Bar:
- Email Collect – Capture emails for your email subscriber list.
- Call to Action – Direct users to a specific action URL.
- Twitter Follow – Direct users to follow a specific Twitter account.
- Facebook Like – Direct users to like a specific Facebook URL.
- Pinterest Follow – Direct users to follow a specific Pinterest account.
- Call To Action URL – Enter a URL for your button to go to when click on. Be sure to include “https://” or “http://” when entering your URL. Applies to “Call To Action” bar only.
- Call To Action Target – Choose whether your button opens in the same window or a new window. Applies to “Call To Action” bar only.
- Heading – Customize the copy, font, and colour of your heading. If you would prefer not to have one you can leave it blank.
- Body Text – Customize the copy, font and colour of your message. If you would prefer not to have one you can leave it blank. HTML is allowed.
- Button – Customize the copy and colour of both your call to action and its button. Applies to “Email Collect” bar and “Call To Action” bar only.
- Email Placeholder – “Enter your email address” or “ [email protected]”. Applies to “Email Collect” bar only.
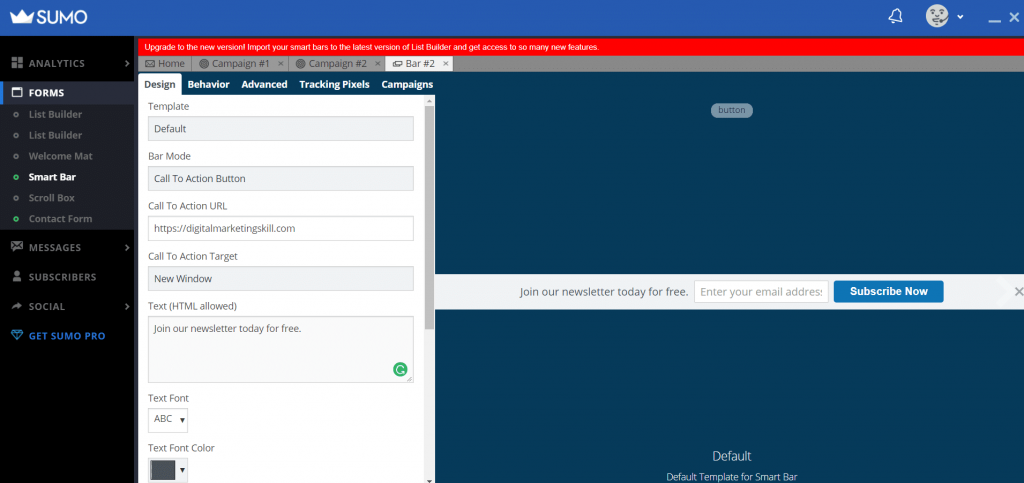
After you’re satisfied setting up your design, click on the green “Save” button on the bottom right of the screen.

Test your site using your device(s) or in new browser window, preferably Google Chrome in incognito mode.
Setting up analytics
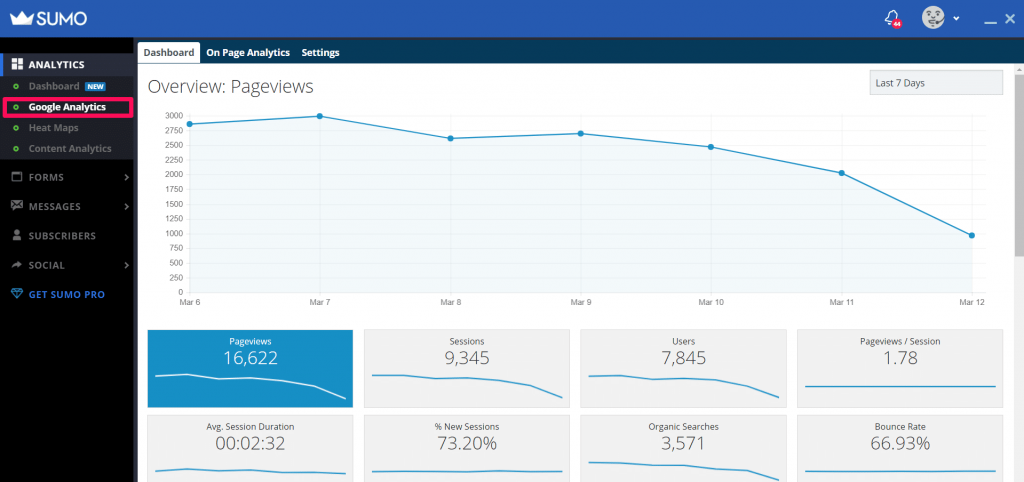
You can use the Google analytics by Sumo to save yourself all the hassle of Google analytics’s complexities.
What’s even better is how easy it is to connect and start seeing your critical metrics live on your page!
Here’s what to do:
- Go to the Sumo Store
- Click on Google Analytics
- Click FREE and Install, then OPEN
- Click CONNECT
- Connect your Google Account
- Choose website’s tracking id
- You’re connected!
These are all the creative ways you can use Sumo apps to grow your business. As you can see its features make it easy to carryout all your online marketing tasks from one place. Using this one tool can save you both money and time.
So go ahead and sign up for a Sumo account and use it to drive traffic, leads, followers and customers and of course to track visitors with their various analytics.

